To set up IPTV on a BuzzTV box, open Settings → Server on the built-in BuzzTV app, copy the portal MAC ID that begins with 00:1A:79, send it to your provider for activation, then return to the same menu and choose one of three options: Add Server for a portal URL, Add Streaming Line for Xtream Codes credentials, or Add M3U Playlist for a direct link. The box loads your channel list within seconds of a successful connection. No third-party app is required.
BuzzTV builds its boxes around a single idea: everything you need lives in one menu. There is no separate player to install, no companion website to visit, and no pairing code to type. Once you have your IPTV subscription details and know where that menu is, as well as which of your two MAC addresses matters, the whole setup usually takes about ten minutes.
What follows is the full sequence, from unboxing to a channel on screen. Each section is one step. Complete it before moving to the next.
Step 1 — Connect the box and get it online
Start with the physical setup and the network. On a device you’ll use daily, a wired connection gives you a stability that Wi-Fi doesn’t always guarantee.
- Connect the box to your TV with the HDMI cable.
- Plug in the power supply and switch the box on.
- Select the correct HDMI input on your TV.
- Wait for the BuzzTV home screen to appear.
- Connect the box to the internet (Ethernet, or Wi-Fi through the network settings).
Once the home screen is showing and the connection is live, the box is ready to configure. Everything from here happens in its settings.
Step 2 — Open the settings and find your MAC address
The MAC address is the single most important piece of information in the whole setup: it’s what identifies your box to your provider’s server.
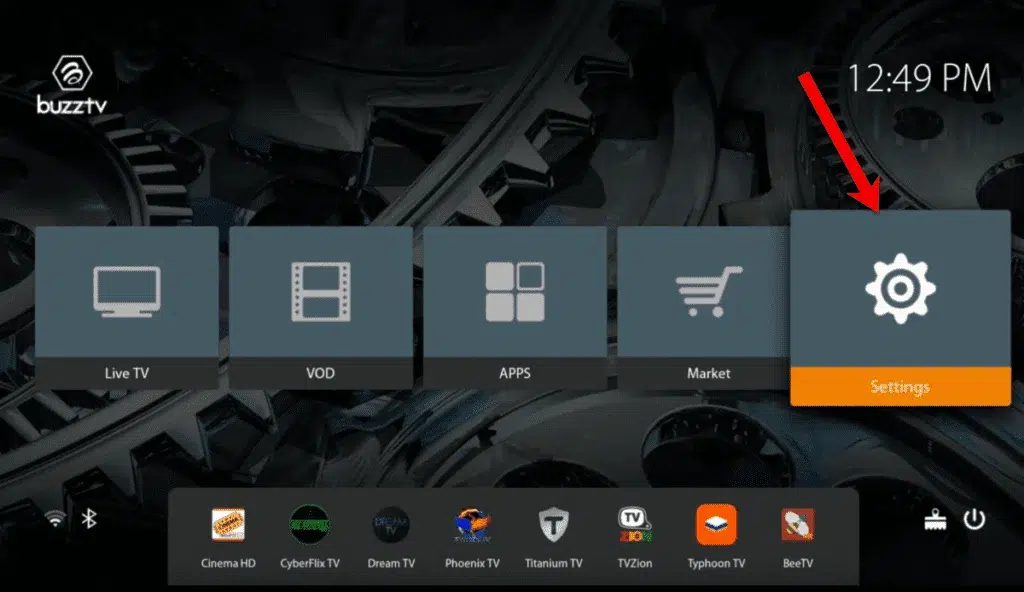
From the home screen, open Settings (the gear icon).
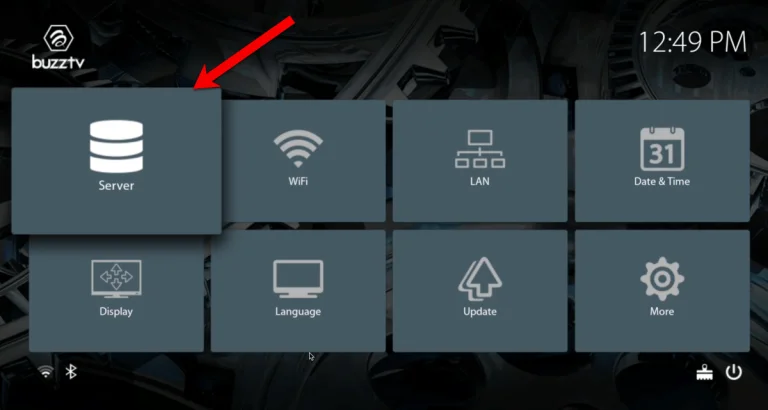
Select Server (or Server Settings, depending on your firmware version).
Find the MAC address shown on screen — a twelve-character code.
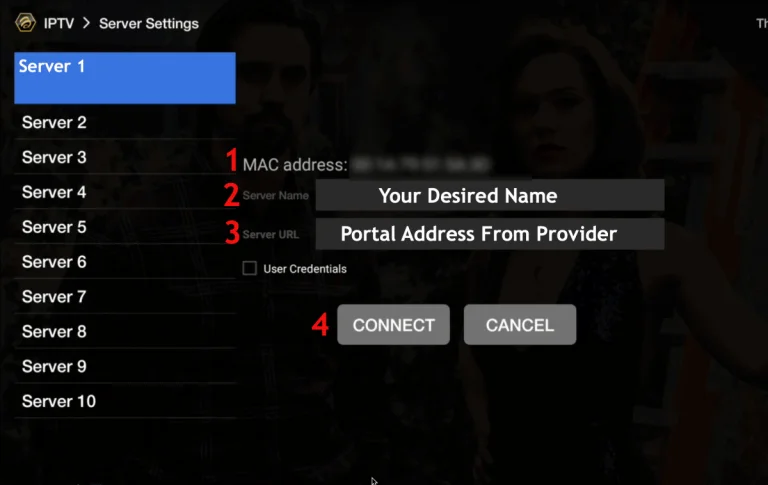
Write it down carefully, without mixing up similar characters.
The MAC address also appears on a label underneath the box, marked “MAC” or “MAC Address“. Copy it exactly as it appears: this is the identifier your provider will register to open your access.
Step 3 — Get your MAC address activated
This step doesn’t happen on the box but on your provider’s side, and it can’t be skipped.
Send the MAC address you noted to your provider.
Wait for them to confirm your subscription is active on their server.
Collect the portal name and portal URL they send back to you.
Until your MAC is activated, no URL will work, however perfectly you type it. That’s why this activation is a prerequisite rather than a formality. Depending on the provider, it takes anywhere from a few minutes to a few hours.
Step 4 — Enter the portal name and URL (recommended method)
With your MAC active and the portal URL in hand, the configuration itself is quick.
In Settings
→ Server, choose to add a server or portal.
In the first field, enter a name (Portal Name) — anything you like, to identify the source.
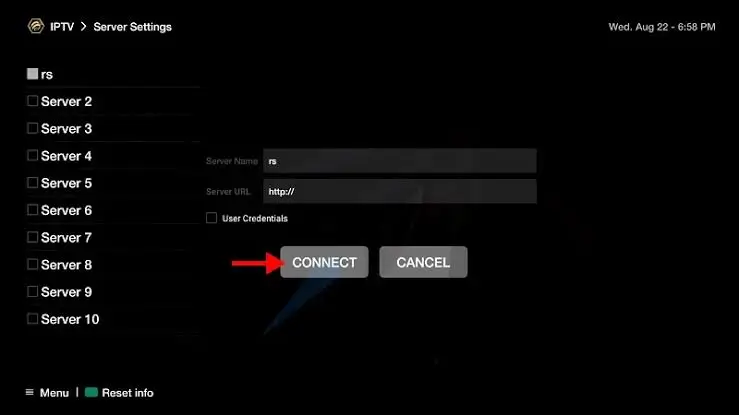
In the second field, enter the portal URL supplied by your service.
Check the address character by character: portal URLs are case-sensitive.
Click Connect.
The name has no technical function; it simply helps you recognise the source. The URL, on the other hand, has to be exact down to the last character — a single wrong capital or typo is enough to block the connection. Copy and paste it if you can.
Step 5 — The alternatives: Xtream Codes or M3U
If your provider doesn’t work through a portal, the BuzzTV player accepts two other formats, in the same settings section.
For an Xtream Codes connection:
- Choose the XC API option (Xtream connection).
- Enter the server address with its port, your username and your password.
- Give the source a name, then confirm.
For an M3U link:
- Choose the M3U option.
- Paste your full M3U link.
- Give the source a name, then confirm.
In both cases, remember to include the port after the colon for Xtream, and to respect the capitalisation of your credentials. These alternatives are useful depending on what your provider gives you, but on BuzzTV the portal method remains the most common — and usually the smoothest.
Step 6 — Load the channels and the guide
With the configuration saved, all that’s left is to open live TV and see the result.
Go back to the BuzzTV home screen.
Open Live TV.
Wait a few seconds while the channels and the guide load.
Browse the categories to check everything is showing.
Select a channel to start playback.
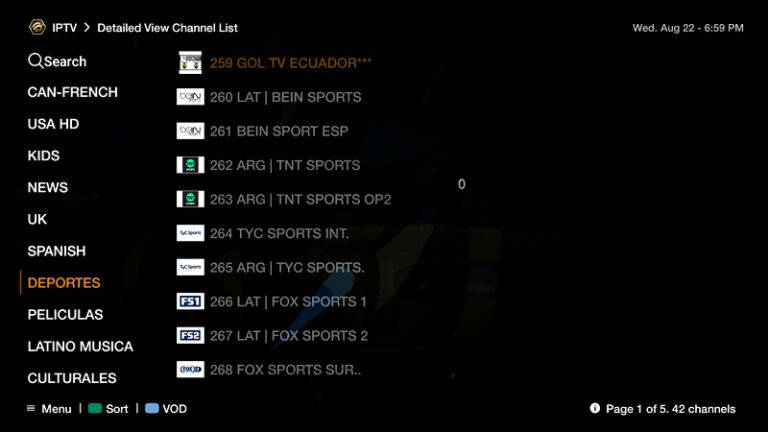
On BuzzTV, the programme guide usually comes through with the channels automatically, with no extra setup. Just give it time to load. If the schedule times look shifted, look for a time zone setting to realign them.
Step 7: Test, tune and troubleshoot
Before calling it finished, open channels from at least three different groups. One broken channel points at a stream-side problem; every channel failing points at configuration or network.
“Subscription expired or not activated” — almost always the wrong MAC address. Ask your provider which one is on file and confirm it is the 00:1A:79 portal ID.
Portal refuses to connect — check case, check the port, check for a duplicated http://, check for a trailing space.
Black screen on a channel that should work — switch between hardware and software decoding in the player settings. The optimal choice varies per stream, which is why a channel that fails for you may work fine for someone else on the same provider.
Constant buffering — network, nine times out of ten. Reboot the box and the router first; this alone resolves a surprising proportion of cases. Then move to Ethernet.
Empty channel list after a successful connection — usually the simultaneous connection limit. Close sessions on other devices and wait a few minutes, since many servers hold a session open after the app closes.
Everything worked, then stopped — check subscription validity first, then look for an app update. Server-side changes sometimes require a newer client.
Frequently Asked Questions
Do I need to install a separate IPTV app?
Generally not. The built-in BuzzTV app handles all three connection types and is tuned for the hardware. Third-party players are worth considering only for a specific feature the native app lacks.
Which MAC address does my provider actually need?
The portal ID beginning 00:1A:79, shown in the Server menu. Not the Ethernet or Wi-Fi address, and not necessarily what is printed on the underside label.
Can I run more than one subscription on one box?
Yes. The Server menu holds multiple portals, Streaming Lines and playlists simultaneously, and you switch between them freely. Just do not stream from two at once.
What happens when I buy a new BuzzTV box?
With a MAC portal, contact your provider to re-register the new device. With a Streaming Line or M3U link, nothing — your credentials are not tied to hardware. This is the strongest practical argument for the Xtream route.
Does a factory reset cancel my subscription?
No. The subscription is bound to your MAC ID, which does not change. Only local settings are wiped, so you simply re-enter the portal URL.
How long does provider activation take?
Minutes to hours, depending on the service. Until it completes, a perfectly correct URL will still return an error. Waiting is the correct response.
Is Wi-Fi good enough?
For HD on 5 GHz near the router, yes. For 4K, or in a house with many connected devices, Ethernet is meaningfully better. Most buffering complaints are solved by a cable.
Can I record programs?
On models with sufficient storage or an attached USB drive, yes. Capacity and simultaneous-recording limits depend on the model.
Conclusion
Setting up IPTV on a BuzzTV box comes down to four actions: read the correct MAC ID, have it activated, enter your connection details, and verify the result. Fifteen minutes, most of which is waiting.
The failures cluster around a small number of specific mistakes rather than any real complexity. The wrong MAC address heads the list by a wide margin, followed by the duplicated http:// prefix, case-sensitive portal URLs, and the time zone set carelessly during the opening wizard. Handle those four and there is very little left to go wrong.
If your provider gives you the option, take the Streaming Line. It survives a hardware change without a support ticket, shows your expiry date where you can see it, and presents on-demand content the way it was meant to look.
Finally, keep your MAC ID and portal URL somewhere you can find them. Renewal day and factory-reset day both arrive eventually, and both are considerably easier when you are not hunting through a year-old inbox.