To configure IPTV on a MAG box, connect the device to your TV and the internet, go to the System Settings, open the Servers or Portals menu, enter the portal URL provided by your IPTV service, save the settings, and reboot the box to load your channels.
The setup takes only a few minutes and requires no advanced technical knowledge — just your MAG box, an internet connection, and the portal details from your provider. MAG boxes are dedicated IPTV set-top boxes built specifically for streaming live TV over the internet, which makes them one of the most stable and beginner-friendly options available.
For smooth, uninterrupted playback, pair your device with a dependable IPTV Subscription that offers a stable portal and wide channel coverage. This step-by-step guide walks you through the entire configuration, from the first cable connection to fixing common errors.
Step 1: Connect Your MAG Box to the TV
Start by physically connecting your MAG box to your television. This creates the link that displays your channels on screen.
Plug one end of the HDMI cable into the MAG box.
Connect the other end to a free HDMI port on your TV.
Connect the MAG box power adapter and plug it in.
Switch your TV to the correct HDMI input source.
If you have an older TV without HDMI, most MAG boxes also include AV (RCA) outputs as a backup option.
Step 2: Connect the Box to the Internet
Your MAG box needs internet access to stream channels. A wired connection gives the most reliable results.
For the best stability, plug an Ethernet cable from your router into the MAG box.
To use Wi-Fi instead, you may need a compatible USB Wi-Fi adapter.
Go to Settings, then Network, to confirm the connection.
Wait for the box to show it is successfully connected.
Live TV is sensitive to connection drops, so choose Ethernet over Wi-Fi whenever your setup allows it.
Step 3: Power On and Open the Main Menu
With everything connected, turn on the box and let it start up fully. The main interface is where all configuration happens.
Press the power button on the remote.
Wait for the MAG box to finish booting to the home screen.
Locate the System Settings menu (the gear icon).
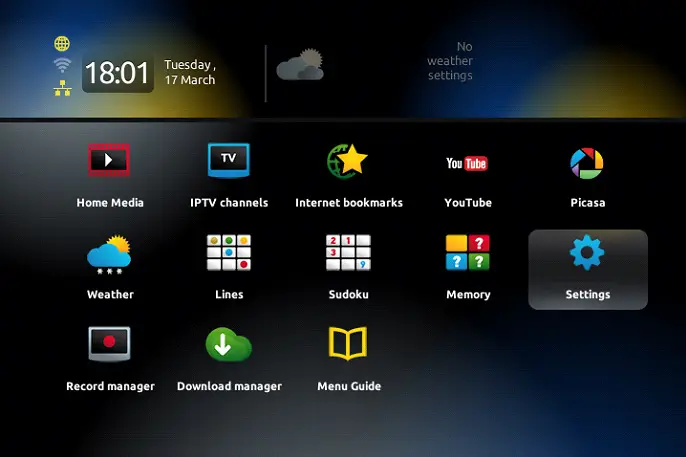
Use the remote’s arrow keys to navigate.
The first boot can take a little longer than usual while the box initializes — this is normal.
Step 4: Check for a Firmware Update
Before adding your portal, make sure the box is running the latest firmware. Updated software prevents many common playback problems.
Open System Settings, then Software Update.
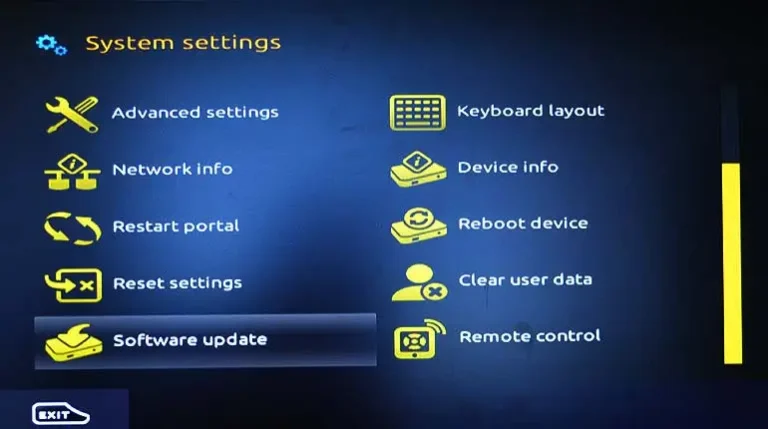
Select Check for updates or USB/Network update.
If an update is available, let it install and reboot.
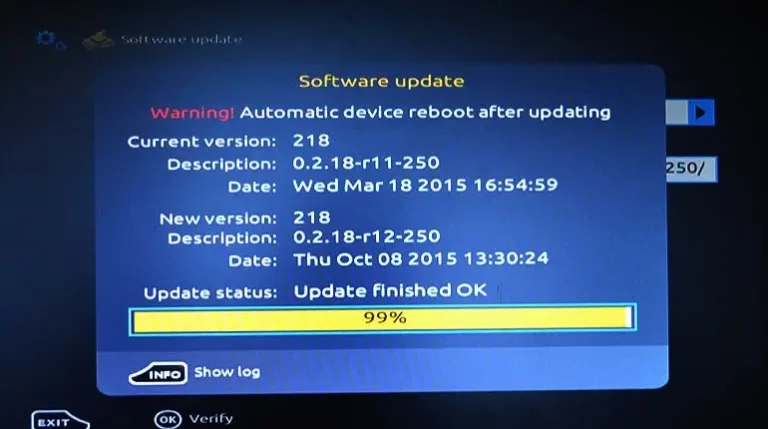
Confirm the firmware version after the restart.
Skipping this step is fine if your box is new, but an update often fixes lag and compatibility issues on older units.
Step 5: Open the Portal (Servers) Menu
The portal is the address that links your MAG box to your provider’s channel list. You’ll find it inside the settings menu.
From the home screen, go to System Settings.
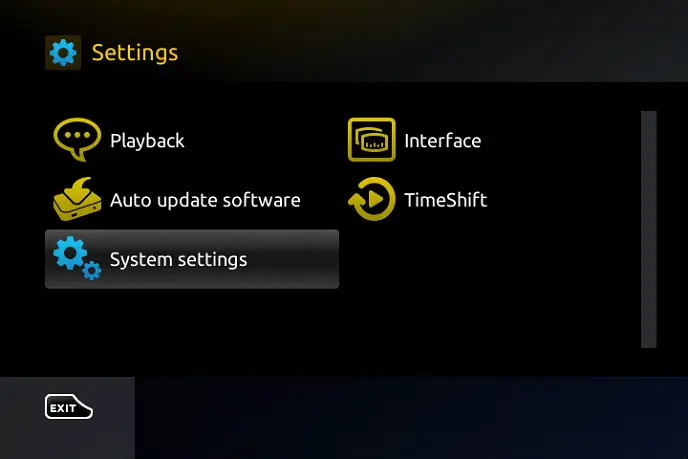
Select Servers, then Portals (the wording varies slightly by model).
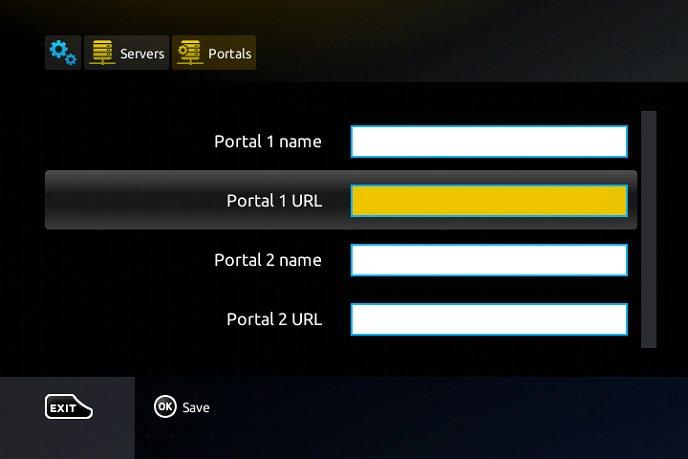
You’ll see fields labeled Portal 1 and Portal 2.
Choose Portal 1 to begin entering your details.
Only Portal 1 is needed for most setups — leave Portal 2 empty unless your provider tells you otherwise.
Step 6: Enter the Portal URL
This is the most important step. The portal URL connects your box directly to your subscription’s channels.
In the Portal 1 Name field, type any label you like (for example, “My IPTV”).
In the Portal 1 URL field, enter the exact address your provider gave you.
Type the URL carefully, including http:// and any port number.
Double-check every character before continuing.
A single wrong letter or missing symbol will stop the portal from loading, so accuracy here matters most.
Step 7: Save Your Settings
Once your portal details are entered, save them so the box can apply the configuration. Skipping this step means your settings will be lost.
Press OK or the save option on your remote.
Look for an on-screen confirmation that the settings were stored.
Exit back to the main System Settings menu.
Avoid turning off the box during this process.
If your remote has a dedicated colored button for saving, the on-screen instructions will tell you which one to press.
Step 8: Reboot the MAG Box
A restart tells the box to connect to your portal and download the channel list. This is what brings your subscription to life.
Return to System Settings and select Restart Portal or Reboot.
Alternatively, unplug the power for ten seconds and plug it back in.
Wait for the box to fully reload to the portal screen.
Your provider’s loading screen should now appear.
If the box returns to the default menu instead of your portal, re-check the URL in Step 6 for typos.
Step 9: Wait for the Channels to Load
After rebooting, the box imports your full channel lineup and program guide. Give it a moment to finish on the first launch.
Let the portal download the channel list and EPG (program guide).
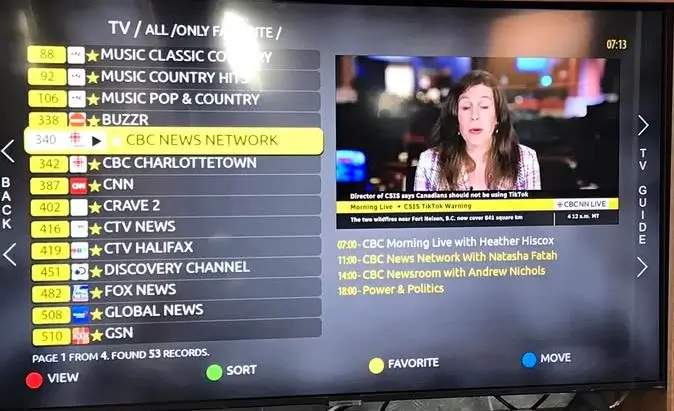
Do not interrupt the box while it loads.
Once complete, channels appear sorted into categories.
The guide shows current and upcoming programs.
Larger channel packages take slightly longer to load the first time — this is completely normal.
Step 10: Test Playback and Troubleshoot
Finally, open a few channels to confirm everything works, and run quick checks if anything seems off. A short test now saves headaches later.
- Open several channels to confirm they play smoothly.
- No channels loading? Recheck the portal URL and your internet connection.
- Buffering? Switch to Ethernet or restart your router.
- Portal error? Confirm your subscription is active with your provider.
- Frozen screen? Reboot the box and try again.
If problems continue across all channels rather than just one, a quick message to your provider’s support team usually solves it fast.
Conclusion
Configuring IPTV on a MAG box is straightforward once you know the order of steps: connect the box to your TV and the internet, update the firmware, enter your portal URL in the Servers menu, save, and reboot to load your channels. The entire process takes just a few minutes, and because MAG boxes are purpose-built for IPTV, they tend to run more reliably than general-purpose streaming devices.
To keep playback smooth, stick to the essentials: use a wired connection where possible, type your portal URL with care, keep the firmware updated, and always choose a legitimate, properly licensed provider.
The streaming landscape keeps shifting in favor of internet-based TV — Canadian regulators have even introduced new rules requiring major streamers to fund Canadian content, a sign of how central online streaming has become. Follow the ten steps above, keep your subscription active, and your MAG box will deliver dependable live TV for years to come.
FAQ
What is a MAG box used for?
A MAG box is a dedicated set-top device designed to stream IPTV channels over the internet. You connect it to your TV and enter a provider’s portal to watch live TV, movies, and series.
Is configuring IPTV on a MAG box legal?
The MAG box and IPTV technology are legal. Legality depends on your provider — always choose a service that holds proper licenses for the content it streams.
Why won’t my MAG box load the portal?
The most common cause is a typo in the portal URL. Re-enter it carefully with the correct http:// prefix and port number, and confirm your internet is working.
Do I need a Wi-Fi adapter for my MAG box?
Only if you can’t use a wired connection. Many MAG boxes need a compatible USB Wi-Fi adapter, while Ethernet works straight out of the box and is more stable.
How do I update my MAG box firmware?
Go to System Settings, then Software Update, and choose a network or USB update. Keeping firmware current prevents lag and many playback errors.
Why does my MAG box keep buffering?
Buffering is usually caused by a slow or unstable connection. Switch to Ethernet, restart your router, or check your internet speed to fix it.
Can I use two portals on one MAG box?
Yes, MAG boxes have Portal 1 and Portal 2 fields, so you can store two services. Most users only need Portal 1 for a single subscription.