The TVIP S-Box is a multimedia set-top box built around a Stalker-based platform, handling live channels, video on demand and OTT content, with USB and SD card support, timeshift recording and EPG in both XMLTV and JTV formats. It behaves much like a MAG box and emulates its embedded software closely, which is why the setup will feel familiar if you’ve configured one before.
This guide covers the current firmware found on models such as the 605 and 615. If you own an older unit a 410, for instance, either update the operating system first or follow the legacy procedure, as the menu structure is different.
One thing to be clear about from the start: the box ships with no channels of its own. Everything you’ll see on screen comes from an active IPTV subscription, which you’ll connect using either a portal URL or an M3U link.
Step 1 — Connect the box and complete the first-run setup
Start with the physical setup and the initial configuration wizard. On a device you’ll use daily, a wired connection gives you a stability that Wi-Fi doesn’t always guarantee.
- Connect the TVIP box to your TV with the HDMI cable.
- Plug in the power supply and switch the box on.
- Select the correct HDMI input on your TV.
- Work through the first-run prompts, setting your language and time.
- Connect the box to the internet (Ethernet, or Wi-Fi through the network settings).
Don’t skip the time setting: an incorrect clock is one of the most common reasons the programme guide later shows the wrong schedule. Once the main menu appears and the connection is live, the box is ready to configure.
Step 2 — Find your MAC address
The MAC address is the single most important piece of information in the whole setup: it’s what identifies your box to your provider’s server.
- Turn the box around and look at the label on the rear panel.
- Find the MAC address, a twelve-character code.
- Write it down carefully, without mixing up similar characters.
Unlike some boxes, TVIP prints this on the back of the unit rather than burying it in a menu, so note it down before you mount the box behind your TV. This is the identifier your provider will register to open your access.
Step 3 — Register your MAC address with your provider
This step doesn’t happen on the box but on your provider’s side, and it can’t be skipped.
- Log in to your IPTV dashboard, if your provider gives you one, and add the MAC address to your line yourself.
- If there’s no dashboard, send the address to your provider and ask them to assign it.
- Collect the portal URL they give you in return.
Most established providers offer a client dashboard where you can attach a MAC address to your subscription without waiting for support. If yours doesn’t, allow some time, until the address is registered on the server, no portal URL will work, however perfectly you type it.
Step 4 — Open the TV settings
With your MAC registered and the portal URL in hand, the configuration itself takes a couple of minutes.
From the main menu, scroll down to Settings.
Select TV.
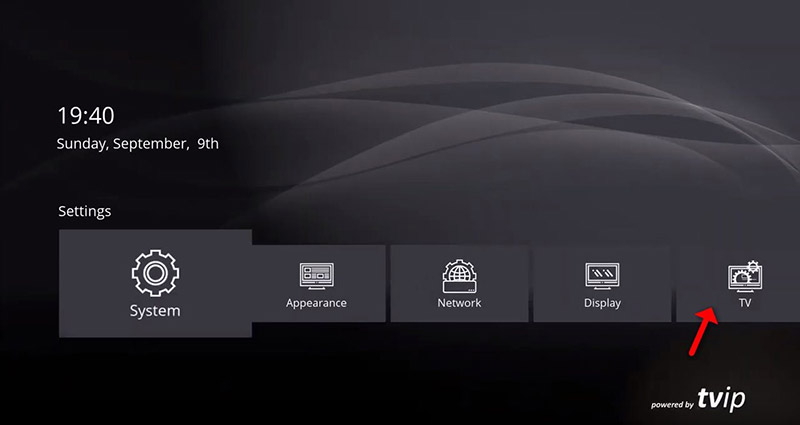
On current firmware, the TV section sits directly in the settings list — you no longer have to go through a side menu as on older models. This is the section that decides where the box looks for its content.
Step 5 — Switch the content source to Web portal
Two fields here tell the box to stop using its built-in sources and load everything from your provider instead.
Change Content source to Web portal.
Select Setup Web portal.
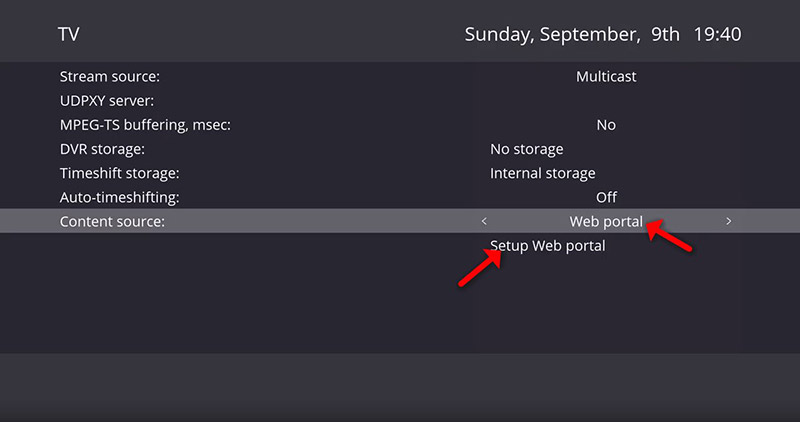
Nothing will change on screen yet. The portal dialogue opens next, and that’s where the actual connection details go.
Step 6 — Set the API mode and enter your portal URL
The order matters on the new firmware: set the API mode before you type anything else.
Set API Mode to MAG.
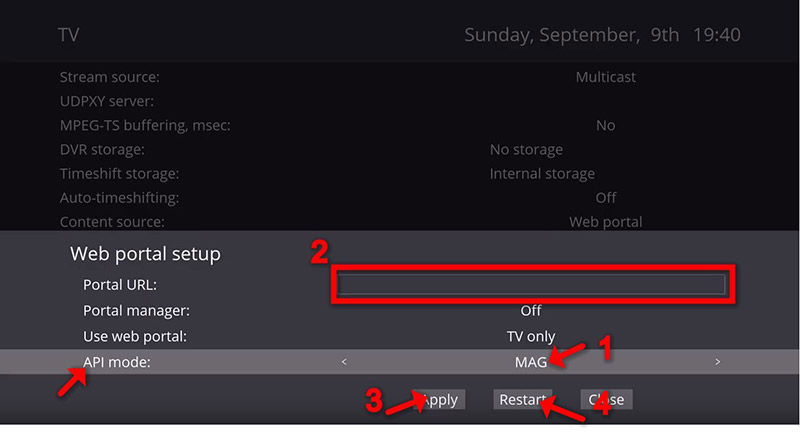
In the Portal URL field, enter the server address supplied by your IPTV provider.
Select Apply.
Select Restart when prompted.
Check the URL character by character before applying: portal addresses are case-sensitive, and one wrong capital is enough to block the connection. If your firmware offers no MAG option, choose GSTB instead — that’s the older API name and it does the same job. The restart isn’t optional here; the box only picks up the new portal settings once it has rebooted.
Step 7 — Load your channels
With the box back up, all that’s left is to let the portal do its work.
From the main menu, select Watch TV.
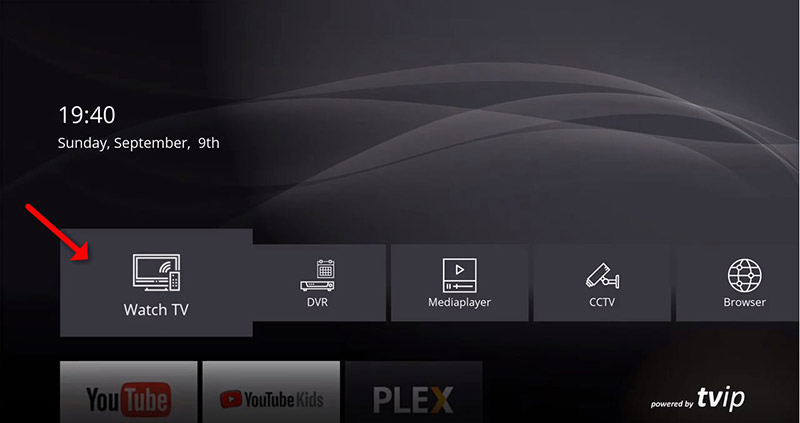
Wait a few minutes while the portal loads your playlist.
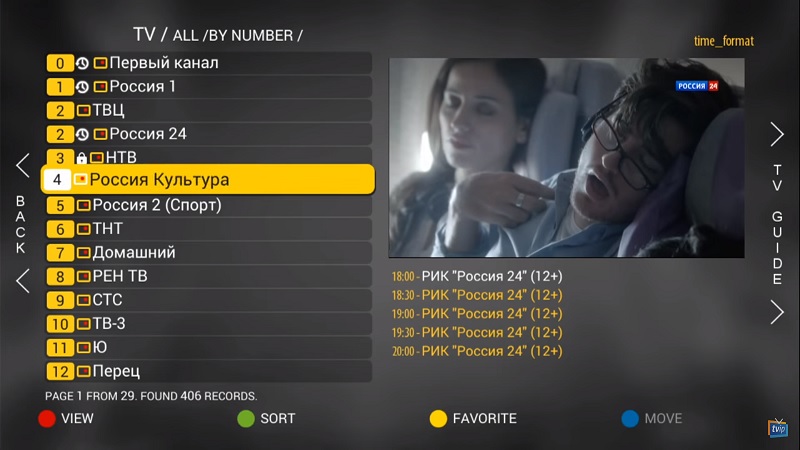
Browse the channel list once it appears.
Select a channel to start playback.
The channels populate on their own, there’s no manual import or refresh to trigger. The first load is the slowest, since the box is pulling the full channel list, the VOD catalogue and the guide at once. If nothing appears after several minutes, go back to Step 3 rather than retyping the URL: an unregistered MAC is a far more common cause than a typo.
Alternative — Using an M3U link instead
If your provider gives you an M3U link rather than a portal address, the procedure is identical up to Step 5, where you take a different branch.
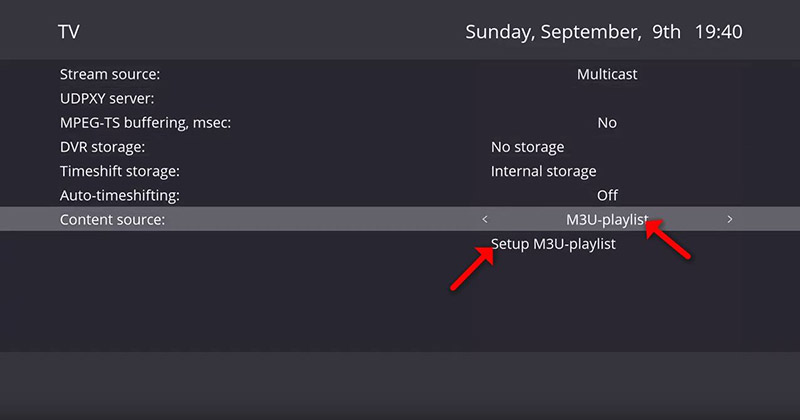
In the TV settings, change Content source to M3U-playlist.
Select Setup M3U-playlist.
Paste the full M3U link supplied by your provider.
Select Apply, then Restart.

There’s no API mode to set on this route, since M3U doesn’t use the Stalker protocol — and for the same reason, MAC registration isn’t required either. The trade-off is that M3U playlists often come with a more basic guide than a portal connection provides.
Conclusion
Setting up IPTV on a TVIP box comes down to three things done in the right order: registering your MAC address with your provider, pointing the box at the correct portal URL, and restarting so the settings take effect. Get those right and the channel list builds itself.
The current firmware on models like the 605 and 615 differs from earlier units in small but decisive ways, the TV menu sits directly in Settings, the API mode has to be set before the URL, and the reboot is mandatory rather than optional. Following an old 410 tutorial on a new box is the most common reason a setup that looks correct produces nothing on screen.
If you’d rather not deal with portals at all, the M3U route works on the same hardware with fewer steps, at the cost of a less complete programme guide. Either way, keep your portal URL and login details somewhere safe: you’ll need them again after a factory reset or a firmware update.
Frequently Asked Questions
Where do I find the portal URL?
Your IPTV provider supplies it — it’s the address of their Stalker server. Look in your client dashboard first; if it isn’t listed there, contact the provider directly. It isn’t something the box generates or that you can guess.
Why aren’t any channels loading?
In most cases the MAC address hasn’t been registered on the provider’s server. Add it through your dashboard, or ask your provider to assign it to your line. Check this before you start retyping the URL — an unregistered MAC is far more common than a typo.
My box has no MAG option in API mode. What do I do?
Choose GSTB instead. It’s the older name for the same function and works fine. If you’d rather have the current menu, update the box to the latest firmware.
Where is the MAC address on a TVIP box?
On the label on the back of the unit. Note it down before mounting the box behind your TV, since you’ll need it again if you ever change providers.
Do I need to register my MAC address for an M3U setup?
No. MAC registration only applies to portal connections, which use the Stalker protocol. An M3U link authenticates through the URL itself.
My box is a 410 — can I follow this guide?
Not as written. Older models use a different menu structure, with the TV icon in a side menu and no API mode field. Either update the operating system to bring it in line with current firmware, or follow a guide written for the older version.
How long should the first load take?
A few minutes is normal. The box pulls the full channel list, the VOD catalogue and the guide in one go, so the first load is always the slowest. Subsequent starts are much quicker.
The programme guide shows the wrong times. How do I fix it?
Check the box’s time and time zone settings, set during the initial configuration. A wrong clock shifts the entire schedule even when the guide data itself is correct. day both arrive eventually, and both are far easier when the details are not buried in a year-old email.